What Is Middle Gray in Photography? (And How to Find It Anywhere)

If you dive down the rabbit hole of exposure or metering, you won’t get too far before you come across the term “middle gray.” It may also be referred to as “neutral gray,” “18% gray”, or “Zone V.”
Most simply defined, middle gray is the very center tone between absolute black and absolute white.
The light meter in your camera is a reflective meter (also known as a spot meter). It measures the light that reflects off of the subject, but it has one catch; It wants everything to be middle gray at perfect exposure. To understand how to use a reflective meter with total accuracy, you have to also understand what middle gray is and where to find it, even amid nothing but color. We’re going to show you how.
|
Key Takeaways |
|
✓ Middle gray is the tonal midpoint between absolute black and absolute white — the target your camera meter is always calibrated to. |
|
✓ It’s also known as 18% gray and Zone V; the terms are used interchangeably. |
|
✓ Camera meters read tonality, not colour — so middle gray is really middle tone. Any colour can be Zone V if its brightness lands in the right place. |
|
✓ Common Zone V tones in the real world: lighter grass, pure reds, pure greens, deep sky blue, grey stone, weathered asphalt, tanned or lighter skin. |
|
✓ Can’t find Zone V? Find Zone II (deep shadows with visible texture) and expose three stops above it. |
|
✓ An 18% gray card is the most reliable shortcut — but understanding the Zone System means you can find middle gray anywhere without one. |
The Zone System: Where Middle Gray (18% Gray) Comes From
It may come as no surprise that I bring up the master of tone, Ansel Adams. Around 1939-40, he and portrait photographer, Fred Archer developed a method and technique for determining optimal exposure. They dubbed it The Zone System.
The Zone System consists of a full tonal scale, ranging from absolute black to absolute white. The scale is divided into 11 sections, each with its own tone and value. The value ranges from 0-X, (That’s Roman Numeral, 10), with “Zone V(5)” in the very center, representing middle gray.
Each section also represents one stop of light. So, one stop brighter than Zone V would be Zone VI, and one stop closer to white.
Utilizing the system to find Zone V, or middle gray gives us photographers a standard to reference so that we can nail exposure every time, no matter the lighting conditions.
Check out the graph below that shows The Zone System, as well as how it relates to an in-camera meter.

The Zone System
How to Find Middle Gray in Any Scene (Even in Full Colour)
So how does this apply to color and shooting in everyday scenarios?
Meters aren’t programmed to interpret color, only tonality. So middle gray could also be referred to as middle “tone.”
You can find this middle point everywhere you look. It’s like most anything else. The more you do it, and the more you practice, the easier it will become. Try to imagine that what you’re seeing is in black and white. Take a look at the image below.
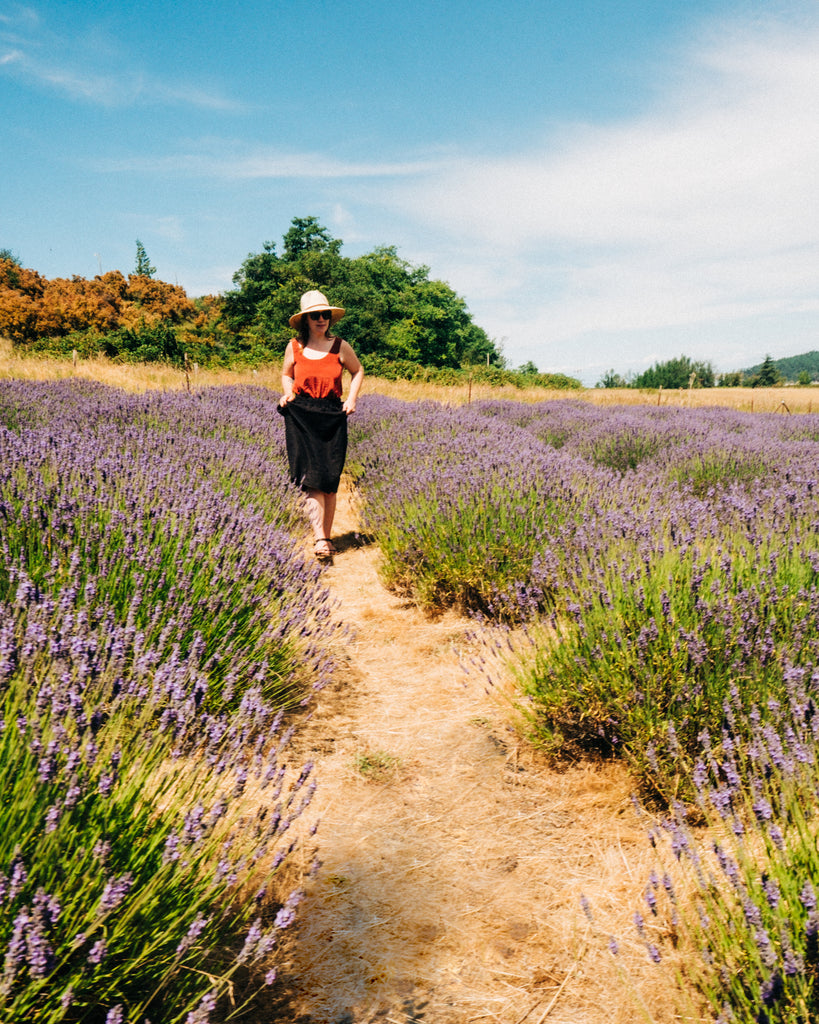
By Chris Daniels, edited with Mastin Labs Ektar 100 preset
And now take a look at where I found middle gray in the scene.


You can see that, in this lavender field, I was able to find middle gray tone on the lavender flowers themselves, in the grass, in the deepest blue of the sky, and on the shirt of the subject.

Common places to find the middle gray tone out in the wild are in lighter grass or foliage, pure reds, pure greens, deep sky blue, gray stone, weathered asphalt, lighter black skin, and tanned, white skin.
For practice in spotting middle gray, I would suggest going to your digital photo archive (or even just the most recent shoot that you’re still editing away on) and selecting a well-exposed image. Make that image black and white and see if you can spot the middle grays. You might even take it a step further and bring it into Photoshop to check it with the eye-dropper tool. Our eyes play tricks on us, so it can become quite the game and challenge. Take a look at the fun optical illusion below:

Is tile A or B darker?

They are the same tone.
What to Do When You Can’t Find Middle Gray: Using the Zone System in Tricky Light
What about situations with super tricky lighting?
If you understand The Zone System, and how the tones work together, you don’t have to only look for Zone V. You can search for other tone zones as well and adjust for middle gray. In a situation where there is a lot of contrast, which would make it more difficult to find middle gray tones, you can rely on shadows.
If you can’t find middle gray (V) but you can find Zone II, which would be deep shadows with visible texture, middle gray is going to be about three stops of light higher. That means that when you meter on Zone II, it should be three stops below perfect exposure and that’s where you set it. As long as the light remains the same, you’ll be shooting with exposure precision, in middle gray.
Refer to the images below:

By Chris Daniels, edited with Mastin Labs Ektar 100 preset


Spoting Zone II in a scene.
With a backlit subject, you have to be careful not to set your exposure from the light shining right at you, which would result in an underexposed image. In this case, instead of finding middle gray, I can easily find Zone II (very dark shadow with details). I find it here in the shadows of the trees, mountains, and even on the back of the subject.
Because I know that Zone II is three stops below Zone V, (perfect exposure), I can meter for that. With my spot meter on a Zone II area, I set my camera to expose three stops under in that area. This configuration of settings will give me the correct exposure of my subject.

Spot meter for Zone II and correctly expose the subject.
You can use this same technique with any Zone that you can accurately pinpoint.
How to Use a Gray Card to Meter for Middle Gray
A straightforward solution to finding Zone V is to use an 18% gray card. A gray card is a standardized tone used in reflective/spot metering to obtain an accurate meter reading. It is the same tone that your camera and other reflective meters are programmed to aim for, so that tone metered at center will result in correct exposure for the scene. You can carry one of these around with you, but chances are, you won’t always have it, and understanding The Zone System enables you to find many different tones and gives you the formula for the perfectly exposed shot.
We would encourage you to save the photo of the graph and keep it on your phone for reference. Even better, consider printing it and keeping it in your camera bag!

Zone System reference card image.
Copy this. Save it. Use it.
Frequently Asked Questions About Middle Gray in Photography
What is middle gray in photography?
Middle gray is the exact tonal midpoint between pure black and pure white. It’s the tone that every camera’s built-in light meter is calibrated to reproduce as the standard for correct exposure. You’ll also see it called 18% gray or Zone V — all three terms refer to the same thing.
Why is middle gray called 18% gray?
18% refers to reflectance: a surface at middle gray reflects approximately 18% of the light that falls on it. Kodak researchers in the 1930s measured the average reflectance of typical daylit scenes and found it integrated to roughly that value, so camera meters were calibrated against it as the standard target.
What is Zone V in the Zone System?
Zone V is the central zone in Ansel Adams’ Zone System — an 11-zone tonal scale running from Zone 0 (absolute black) to Zone X (absolute white). Zone V represents middle gray, the exact midpoint of the scale and the reference point for correct exposure. Each zone above or below it represents one stop of light.
Can I find middle gray in a colour scene?
Yes. Camera meters read tonality, not colour — so middle gray is really middle tone. Any colour can be Zone V if it has the right brightness. Lighter grass, pure reds, pure greens, deep sky blue, grey stone, and tanned skin are all common places to find middle tone in everyday scenes.
What do I do if I can’t find middle gray in a high-contrast scene?
Use Zone II as a fallback. Zone II describes deep shadows that still contain visible texture. Because Zone II is three stops below Zone V, spot meter your Zone II area and expose three stops above that reading. As long as the light doesn’t change, you’ll land on correct exposure.
Do I need a gray card to shoot with middle gray?
No — a gray card is a reliable shortcut, but it’s not essential. An 18% gray card gives your meter an unambiguous Zone V reference so you don’t have to find one in the scene. Once you understand the Zone System though, you can identify middle tone anywhere and meter accurately without the card.
Does my camera automatically meter for middle gray?
Yes. All reflective light meters — including the one in your camera — are calibrated to expose any reading as Zone V. This is true regardless of metering mode. It’s why a snow scene comes out underexposed if you trust the meter without adjustment: the camera is trying to render the white snow as middle gray.
How does understanding middle gray help when using film presets?
Film presets like Mastin Labs are built around correctly exposed negatives. The tonal relationships in a film stock — how highlights roll off, how shadows hold detail — only work as intended when the base exposure is right. Metering accurately for middle gray gives the preset the tonal range it needs to reproduce the look of the original film.


